Scrap Drone History
This contains some old, obsolete or otherwise less important information that is here to show the try-and-error process of the scrap drone, or might be of some entertainment value.
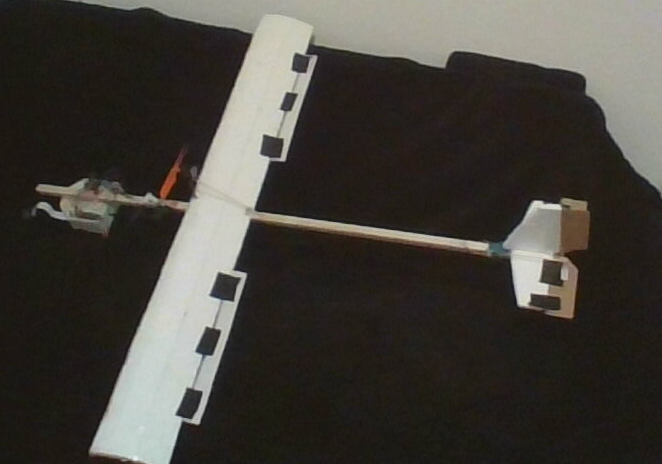
The Old Power Train
Choo choo, all aboard! Originally, I chose to use the particular AVR module (“Baby Orangutan B-328”) because of its internal motor driver. While the motor driver is pretty weak for a drone (2x 3 A peak), it might just work for a slow flyer, or so I thought. As it turned out, it didn’t.
For the motor, I originally wanted to re-use one arm of a really
cheap quadrocopter that never really flew well and died pretty quickly.
It is a DC motor (not any of those fancy brushless ones, we’re talking
cheap here) and runs well on 1S.
You can see the whole plane with the old frame and motor here:
As you could read in the first few flight logs, none of this worked.
Power Supply Troubles
In order to simplify things, I originally tried to run the whole setup on a single 5 V source, provided by a step-up regulator from a 1S 900 mAh LiPo. Sensors that need 3,3 V will be powered by the RasPi, and the AVR has a sense wire going directly to the battery connector to measure the voltage.
As a sidenote, this setup lead to some interesting issues with a bench power supply, because the chain of three voltage regulators (AVR regulator, step-up, bench psu) lead to a slow reaction to load changes (like instantly setting the motor from 0 to 100). This actually made the AVR run into it’s brown-out detection and reset. For some reason, I can’t re-program the fuses (low-level config bits) in the AVR, so I just decided to avoid load spikes while using the bench psu. #wontfix #closed
Because I didn’t want to admit defeat after the first failed flights, I searched for a way to increase the motor power without replacing anything. For this, I shorted the two channels of the motor driver together, which means I can get two times the current (6 A peak, 3 A continuous). Still not a lot, but better than before. The downside (beside having to do some questionable SMD soldering) is that there is now an AVR output state that would cause an interesting short circuit and probably release some of the magic smoke.
Airframe Iterations
For the sake of your (and my) sanity, this part will be pretty short. I really don’t know a lot about mechanical engineering, and it showed. The frame was first made of a balsa wood T-style “backbone”. This was really light, but broke a few times. You can see the original frame in the power train part or, in a more recent iteration, in the flight logs. The balsa profile was really easy to twist, which didn’t contribute to the plane’s overall stability.
Then I stepped on the backbone and broke it in half
decided the plane was to big and cut it down, which also eliminated the
torsion problems I had. It’s nice to solve problems like that.
That later version had some reinforcements for the new motor, but still broke (right behind the reinforcements, of course). I finally gave up on balsa wood, at least for the main backbone.
A Tale of a Thousand WiFi Chips
This here describes in detail what doesn’t work. If you want to see what works, go back to the main page.
I originally got myself a pair of TP-Link TL-WN722N V2 (Realtek RTL8188) cards, which are not really supported, but have a third-party driver that enables monitor mode. With those, I successfully made a connection that seemed stable at first. Sadly, smooth video streaming did not work.
I then remembered that the Intel wifi card in my laptop supports monitor mode as well. Using the internal wifi together with the Realtek, I got an almost lag-free video stream and a bi-directional bandwidth of up to 120+ Mbit/s. For the sake of completeness, I tried to skip the Realtek card on the laptop and used only the Intel one, and weirdly, this finally gave me a perfectly smooth video stream.
So, to sum it up:
- Realtek <=> Realtek: Bad
- Realtek <=> Realtek+Intel: Almost good
- Realtek <=> Intel: Looking good
Sadly, it only looked good. Under the hood, I got lots of packet loss and a very limited range. So I kept searching for other adaptors. The original two adaptors were really cheap, so I hoped I could get some equally cheap ones. That was where the trouble started. For some reason, companies decided to make models with the same name / number and totally different internals. My personal guess is that they feel bored and want to play tricks on you for fun. Anyway, your best friends here are angry script kiddies on Kali forums, Amazon comments and so on (wardriving needs very similar features), the various WikiDevi clones (RIP) and the FCC database (in the rare case that you can actually find a FCC id for the thing you want to buy).
Here is a list of wifi cards/sticks that don’t work (well):
- TP-Link TL-WN722N V2: As explained above, not good. The V1 should work well, but you can’t really get it any more.
- TP-Link T4U: V1 and V2 of this stick have the RTL8812AU (good), V3.X has the RTL8812BU (bad). I had people tell me that they had the V2, but then they shipped me the V3.2, so I kind of gave up.
- TP Link T2U Plus: This has a RTL8821AU. Very similar name, very different behaviour. Doesn’t work at all (for our use case).
- Intel “Cannon Point-LP CNVi”: No injection in the 5 GHz band. Everything else is great. Thumbs up to Intel, compared to them, Realtek really shows its low price tag.
- Broadcom bcm43455 (or similar, no idea what really hides under the lid): Onboard chip of my RasPi. Has a fancy driver called Nexmon that will do stuff like SDR, but crashes when injecting more than a few bytes. Also requires quite some setup, and you need some other way of connecting to the RasPi. Maaaaybe I have locked myself out a couple of times.